1. File structure
When you are containerizing your model, there are two important folders you will need:
- The folder holding everything you want in the container
- A folder with your inputs to communicate with the container
Both aspects will be explained further in depth, but it is important that these are two separate folders. A file structure before starting your containerization is as follows
Reconstruction
├── Container
├── Client
In the following steps we will explain what should be inside your container and client folders.
2. Container folder
This folder will hold everything that your final reconstruction model container will hold. You want to make sure you are keeping everything in here that is okay remaining unchanged for the most part.
If you have a file that holds all of your configuration, I would highly suggest you keep that in the client folder instead of inside your containerization folder. Justification can be found here
2.1 Adapter library
The first file you want is the adapter library. This is so you can import it and use the helper functions. You can find the updated raw files below for Python:
Note
Sometimes when you save a file from this type of link, it will try to add an extra .txt extension to it. So it would try to download a file named main.py as main.py.txt. You can easily bypass this by removing the .txt extension from the file name before you save it. That, or you can copy the contents into a new file of the same name.
2.2 Main code
Make sure you have your main climate code file in the container folder, as well as any other supporting scripts or files. Keep note of which file is meant to be the main execution file.
2.3 Data
Make sure that your data is uncompressed here as well. These are often times too big for places like GitHub repositories so don’t forget to make sure they are here.
2.4 Environment file
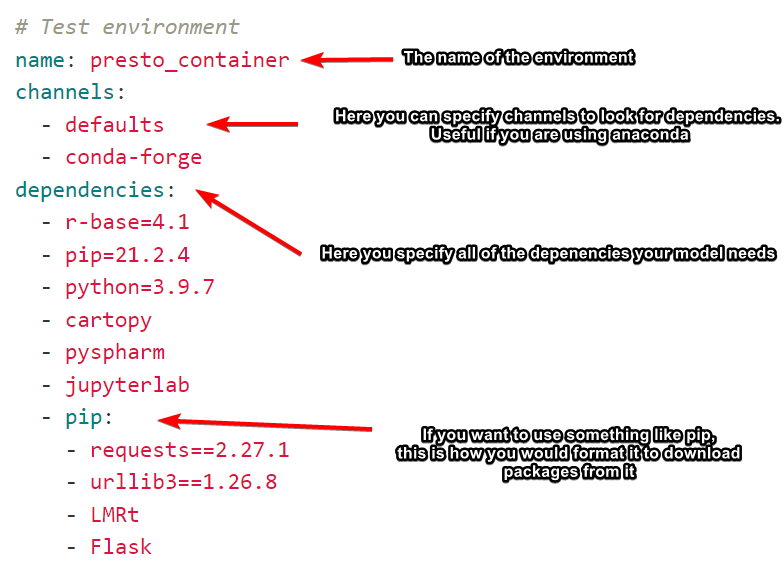
This is a file that our tool will use to set up all necessary libraries and dependencies. It is in the form of a YAML file such as the one below. If you are creating one from scratch you need the template from 2.4.3. Our tool has its own dependencies once inside the container!
Here is an example file that LMRt uses.
name: presto_container
channels:
  - defaults
  - conda-forge
dependencies:
  - r-base=4.1
  - pip=21.2.4
  - python=3.9.7
  - cartopy
  - pyspharm
  - pip:
    - requests==2.27.1
    - urllib3==1.26.8
    - LMRt
    - Flask
If you have your own environment file, there are still some steps you need to do.
2.4.1 Rename
Rename your file to presto_environment.yml or else you will have to change the name in the generated Dockerfile in later steps.
You also need to rename your environment name to presto_container. Again you can keep it as you already have it, but then you will have to change the name in the Dockerfile in a future step.
2.4.2 Add necessary tool dependencies
Our tool has some of its own dependencies itself in order to run. You need to add the following dependencies below for our tool to work.
2.4.3 Template File
If you don’t have the following dependencies, the container will not work
name: presto_container
channels:
  - defaults
  - conda-forge
dependencies:
  - r-base=4.1
  - pip=21.2.4
  - python=3.9.7
  - pip:
    - requests==2.27.1
    - urllib3==1.26.8
    - LMRt
    - Flask
This is an example of what your file structure should look like at this point
Reconstruction
├── Container
│   ├── adapter.py
│   ├── data
│   │   ├── py4493.pk
│   │   ├── ad3010.pk
│   │   ├── adverse30501.pk
│   ├── main.py
│   ├── utils.py
│   ├── presto_environment.yml
├── Client
3. Client folder
This is the folder contains all of the files necessary to communicate with the container. This contains any files you want to send to the model as well as the metadata.
3.1 Input files
If you had a configuration file for your model, this is where you want it. The reason this file is better outside of the container is that often times you will want to test out different scenarios and values. If you add your configuration inside of the container, then they are as good as hardcoded. You would have to go through the entire build process again, which is not desirable. By having the configuration file here, you can send different input values more easily. Instead of having to rebuild the container, you just have to send the new configuration file to a container.
3.2 Metadata
The metadata file is what is used to communicate with the container. It contains any parameters not already in your configuration file (if you have one) as well as the files you want to send to the container. This is in the form of a JSON file.
Example file
{
    "parameters": {
        "recon_iterations": 1,
        "figure_type": "graph",
        "job_dirpath": "./recon"
    },
    "inputs": {
        "configs": "configs.yml"
    }
}
3.2.1 Parameters
Even if you are not using our parameters functionality, you should still have a section in the metadata file for parameters even if you are not using them. You can leave the ones from the template in this case.
You can add any parameters that you do not have in your configuration file here. Instructions for managing your parameters in your climate code are explained in a later section.
3.2.2 Inputs
This section includes any files that you want to send into the container. At the moment, sending entire folders is not supported so you will have to list each file independently. Typically, configuration files are specified here.
3.2.3 Template
{
    "parameters": {
        "param1": "value",
        "param2": 2
    },
    "inputs": {
        "file1": "file.txt"
    }
}
It is important that you name this file metadata.json
This is an example of what your file structure should look like at this point
Reconstruction
├── Container
│   ├── adapter.py
│   ├── data
│   │   ├── py4493.pk
│   │   ├── ad3010.pk
│   │   ├── adverse30501.pk
│   ├── main.py
│   ├── utils.py
│   ├── presto_environment.yml
├── Client
│   ├── metadata.json
│   ├── config.yml
We are now ready to modify our main file so that is it adapter ready